Introduction
For some time I have been developing techniques for teaching writing using Google Docs, starting when my students and I were all in the PC environment a few years back. At that time the students would open documents and share them with me and I would provide feedback as best I could. The quality of the feedback in the Google Docs environment has always been superior to that possible by other means, especially where the class sizes were large or the students not particularly motivated nor attentive. With Google Docs it was always possible to view student writing while students were writing it, and then work one-on-one with whichever students were engaged in the process at the time. This is because the teacher can display any student’s work on his/her personal tablet, or display it on the class data projector and correct it there while the student follows on PC, or as the case may be, on iPad.
The work could of course be corrected asynchronously, after class, while the students were not present. Recently I was correcting a student’s work in my office at a time when the student happened to be in a lecture elsewhere on campus. The student, from his class, was following my corrections in real time and responding to them, multitasking (and perhaps neglecting the lecture). Possibly the lecture was not that interesting, but I like to think that the student was simply more engaged by the notion of working with a teacher one-on-one in real time in addressing feedback on his writing wherever he happened to be, and whenever, not just during our class time. I thought to make a screencast: http://screencast.com/t/fmW5zZoZUF.

Giving feedback on writing is a challenge that does not scale well. Teachers are well aware of how tedious it is to give quality feedback on student writing paper after paper and mechanically by hand. My work with Google Docs has been in an effort to develop techniques for correcting student work as efficiently as possible. My classes are normally large, more than 20 students, and giving meaningful feedback on work prepared by hand on paper in conjunction with sufficient writing practice is hardly feasible. Also when I annotate paper drafts handed in by students, my feedback is rarely acted on; whereas in the Google Docs environment, students will more often read and respond to my comments, and I can deal with classes of 20 students as the work comes in, effectively and efficiently. It’s more efficient for the students as well, since they can focus only on only the issues I have flagged without having to re-write parts of the paper on which I have not commented..
Techniques
Here is the essence of what I have learned over several years of using Google Docs with students:
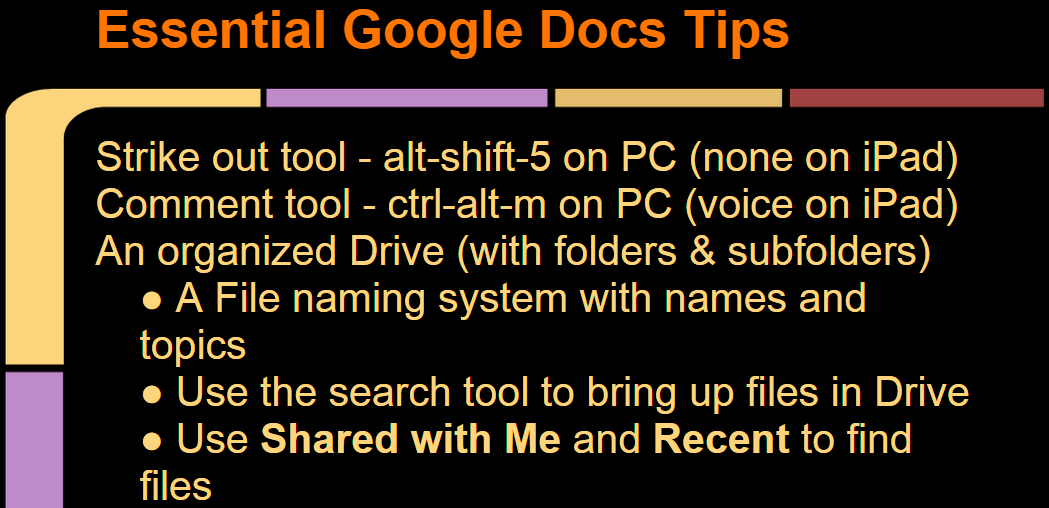
Figure 1 - Shortcuts and tips for using Google Docs in teaching writing
When I first started using Google Docs I used to make corrections to text that are tedious on a PC and even more so to do on an iPad. Also, I had little evidence that my students ever went back to the text to view such details let alone correct them, and so I assume they did not internalize very well what I was trying to make them aware of. I finally settled on just two tools that appear to work best when correcting student writing: the strikeout tool and the comment feature. These are great time-savers when scaled over numerous correction tasks, especially as both have keyboard shortcuts on PC, which make them quick to implement. For strikeout, you merely highlight some text and press alt-shift-5, like this. To make a comment, you highlight the text and press ctrl-alt-m (on PC). My correction technique has distilled almost entirely into using these two tools. Now I find that my students often ask about the comments, and gratifyingly, even correct even correct their work in response to them.
I usually correct student work, whether created on iPad or PC, on a PC. Google Docs on iPad has some omissions, one of which is an obvious strike-through tool. It’s a multi-step process to reach this screen: select the text you want to strike-through, touch the format menu, and finally touch the icon you want (to get at the full range of format features you find on PC, you have to revert to desktop view, where you then lose some useful iPad functionality).

Figure 2 - How to strike through text on iPad
Similarly, leaving comments on iPad is a matter of selecting text and then pressing the comment option. Leaving comments using the iPad touch screen keyboard might be relatively awkward compared to invoking ctrl-alt-m and then typing using the keyboard on a PC, but here we find a time-saver native to iPad and mobile devices in general. On these devices you can activate voice input, which makes it possible to mingle with students, observe their work, bring up their files on your iPad, and literally speak your suggestions into their texts as you move from student to student.

Figure 3 - iPad allows option of typing or speaking comments in Google Docs
As regards management of large numbers of student submissions, it is essential that teachers set up some kind of file structure in Google Drive. When students share documents with you, they can be found under the ‘Shared with Me’ tag, but if you have several classes or several assignments that students share with you, you soon see the benefit of creating folders for classes and for separating assignments into those folders. Google has changed the way that drive looks in the folder view. It used to be that when you “moved” a doc to a folder its tag was removed from Shared with Me, which uncluttered the shared view. Then Google programmers decided not to move the file but to leave it tagged both places (in the Google system nothing really moves; files are simply tagged, so this means the files in Shared with Me now retain rather than lose that tag and so remain visible in the Shared with Me view). Assigning them a new folder, i.e. adding that folder-name tag, means they can be viewed also in that folder, which is really a way of aggregating content according to the folder name under which files so tagged are viewed. In short, if you are working with dozens or hundreds of files, you need to tag them so as to organize them efficiently in Drive (Google have often changed the way this works, looks, and feels, but this is the system at this time of writing).
As regards management of large numbers of student submissions, it is essential that teachers set up some kind of file structure in Google Drive. When students share documents with you, they can be found under the ‘Shared with Me’ tag, but if you have several classes or several assignments that students share with you, you soon see the benefit of creating folders for classes and for separating assignments into those folders. Google has changed the way that drive looks in the folder view. It used to be that when you “moved” a doc to a folder its tag was removed from Shared with Me, which uncluttered the shared view. Then Google programmers decided not to move the file but to leave it tagged both places (in the Google system nothing really moves; files are simply tagged, so this means the files in Shared with Me now retain rather than lose that tag and so remain visible in the Shared with Me view). Assigning them a new folder, i.e. adding that folder-name tag, means they can be viewed also in that folder, which is really a way of aggregating content according to the folder name under which files so tagged are viewed. In short, if you are working with dozens or hundreds of files, you need to tag them so as to organize them efficiently in Drive (Google have often changed the way this works, looks, and feels, but this is the system at this time of writing).
You can of course find your files by searching for them, but this can be tedious if you want to view the work of a particular class, compared to tagging them so they appear to be in folders. Still, one great affordance of Google Docs is that the hundreds or thousands of files you have there are all searchable. You can find files easily by entering a string present in their contents or in a part of the document name, which is one reason it’s a good idea to impose standard naming conventions on files that students create and share with you (and since they share them giving the teacher editing rights, the teacher can always clean up file names so they fall under the convention). I include students’ names as part of my convention because I’ve noticed that in PC view user names are given in your drive listing, but in iPad view, only email addresses of file creators might be given, which might not necessarily help you identify your students.
Another affordance of Google Docs for students is that they can easily share their work with one another. This is a bonus if they are working collaboratively on projects, but some are inevitably tempted to copy / paste each other’s work into their own documents and claim it as their own. So yet another affordance for teachers is that having all your students’ work in one searchable space is a quick and easy solution to the déjà vu feeling teachers get when they realize they have read something before but can’t quite place where or in whose submitted work. If you think something has been shared improperly between students you have only to type in the offending text and all instances of that text in your drive database will appear on your screen. In this case I’ll usually print the documents in question and give copies of each to the students involved, which usually makes it clear to them that they have been exposed and that you have the power to expose them, so they are more likely to stop doing it.
Using PC and iPad together
Finding your voice
With the introduction of digital tools into the writing process, and with texting influencing writing as suggested in David Crystal’s The gr8 db8 (2008), or in Pegrum (2009, as in this example from p.1, reproduced here in Figure 4), writing appears to be converging more and more with its aural origins.
Figure 4:Mark Pegrum generously shared the first chapter of his book with the 2010 EVO Multiliteracies course, where the pdf of that chapter can be downloaded: http://goodbyegutenberg.pbworks.com/w/page/10972803/GettingStarted2010
Lindsay Clandfield gave an interesting presentation which I attended at a recent TESOL Arabia conference where he pointed out that when writing first happened, it was as a way to record what someone had said, either to tell a story on a cave or pyramid wall, or to use a scroll prepared by a scribe to issue forth an edict or proclamation made aurally by an authority, to whom writing might have been a painstaking and specialized skill best left to technicians.
Texting circumvents spelling conventions and reduces keystrokes to concise representations of what the words sound like. Clandfield (2014) sees in this trend, as well as in the new emphasis on communicative methods, a return to oral tradition in writing. In his words:
Rediscovering Writing / What’s happening to writing
Communicative approaches to language teaching have put much value on the oral skill. Classrooms around the world have, over the past thirty years, devoted more and more time in class to speaking, which is generally seen as a good thing. Writing however, has remained relatively unchanged. Often assigned for homework, or in the form of longer pieces of writing (the composition, the essay, the business letter) this skill has just not seemed as interesting as speaking. However, due to technological developments we are all writing now a lot more than we used to. In some cases, we write more to people than we talk to them.
When the college where I teach went over to iPad, I had to get used to the fact that the students had a different set of apps to work with while I mainly used my PC, since with PC I retained superior keyboard functionality and had better access to my organized file structure in Google Drive. The students were able to cope with the iPad environment and use the touch keyboard to enter text despite its annoying limitations. But gradually, as noted earlier, I came to realize that the iPad and other tablet and mobile devices are particularly attuned to voice input. I began to experiment with ways that the option for voice input could augment the task of writing, since much of the data entry work that had been tedious in the past could in fact be short-cut through use of voice activation on iPad.
This piece is about interjecting voice, literally, into writing. It is about utilizing the apps you need to do that, Google Drive and Google Docs, organizing your Drive so that it can accept student work through an efficient content management system, and possibly getting students themselves talking into Google Docs as a way of getting started, if they prefer that to drafting on paper.
Other voice tools on iPad and PC
My EFL students are not able to get the voice tools working for them as well as I can. For them the voice recognition engine stumbles on their mispronunciations and intonation, their inexperience with working with voice (as when they blurt asides while speaking, or don’t enunciate clearly into the mic), and mainly from the ambient noise in the classroom. So I give them the option in class of writing a first draft or brainstorming on paper and then, after collecting the paper, I read their handwritten work into Google Docs. Normally, I use the iPad to read from their handwritten papers directly into a blank Google Doc they have shared with me beforehand. I have that same document open in a PC where I can most efficiently clean up any voice-input errors using the PC keyboard.
Before trying out voice directly in Google Docs, I had tried third party tools such as Dragon Dictation, which does a good job when the speaker enunciates clearly in identifying allophones and making a best guess at typing out utterances from words stored in its comprehensive database (or when for whatever reason, the keyboard mic is not functioning on a student’s iPad - in Dragon Dictation the mic almost always works).
I found I could use this tool on iPad to model writing for the students and project it at the head of the class. I would prompt them and elicit from them their expression of points that fit a process I was trying to inculcate, and as they told me in class what they thought we might write, I would read it into Dragon Dictation and it would all appear on the screen in legible font when projected from iPad onto the whiteboard. The result could then be exported to other apps for manipulation in appropriate tools.
In March 2015, I presented at TESOL Arabia in Dubai about creating listening exercises for students using Dragon Dictation and on one PC counterpart called Dictanote. In Stevens (2015a), I wrote:
… making corrections to the text you have just recorded requires some dexterity with finger pointing and activating the keyboard exactly where you want it to appear in the text, especially if the text has gone to the bottom of the screen. I find it difficult but doable. This leads to the second problem, getting the text from the iPad into something I can work with. For me, real work requires a hard keyboard so I like to create exercises on my PC. To get from Dragon Dictation to a PC I use email, but of course I have to be connected if I want it right away; either that or I have to create multiple texts and leave them on my iPad and get them later when I am back online (see Figure 5, below).

Figure 5: Early experiments with Dragon Dictation
The iPad is wonderful for having all you need, mic and apps, in a single device the size of a mouse pad. But if you are willing to work from PC then there are several tools you can use. One is http://speech-to-text-demo.mybluemix.net/ which allows you to speak into a mic on the left and renders the text on the right. You can copy what you get into whatever you are using to process text and work with that more seamlessly than if you start on iPad and end up on PC.
A tool I like even better is Dictanote, https://dictanote.co/, because it combines speech to text with the functionality of a digital notepad, which allows you to make corrections as you speak in a way that the other applications don’t. Dictanote lets you speak into your word processor and make corrections on the fly. A problem I had initially with Dragon Dictation was that I was unable to signal carriage returns, so paragraphs of text tended to run together and were hard later to tease apart. I have since found that if you keep handy a set of voice commands, you can invoke pronunciation; see for example http://isource.com/2009/12/09/some-tips-for-dragon-dictation/.
With Dictanote I can simply join up text or enter the carriage returns on the fly where I need them a lot more easily than I can with Dragon Dictation or Google Docs on the iPad. There’s a full set of text processing tools available, even an autocorrect tool (though it doesn’t know when users are trying to say the name of the product :-). Still, you can do preliminary work right in Dictanote and copy your text from there into your word processor pretty much the way you want it (Figure 6).
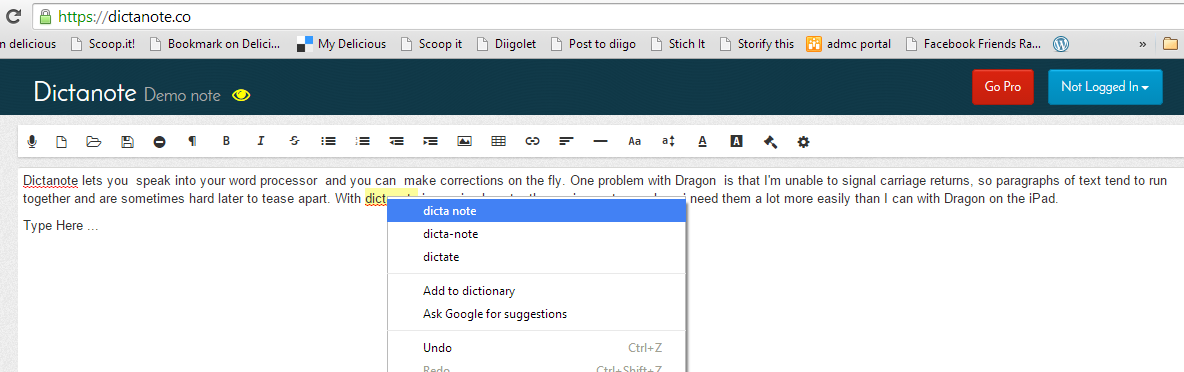
Figure 6: Dictanote in action
Yet another advantage of using continuous SR engines is that while you are recording into them, you can create a simultaneous audio recording on another device. I like to speak into Dragon Dictation or Google Docs on my iPad while recording that speech in Audacity on a PC. It makes good recordings for EFL learners because I speak distinctly during voice input, and if anything too slowly for Audacity, but it is an easy matter to go back into the recording to remove gaps and close up the utterances (and if you speak into Google Docs on iPad you can clean up the text on a PC more easily than you can on iPad).
The affordances of these tools used in conjunction on mobile and desktop devices open many possibilities for language learning contexts. Once you learn how to speak punctuation into your iPad or dictation-enabled device, life gets even easier.This screen-shot from a Lifehacker post illustrates the process (Figure 7):
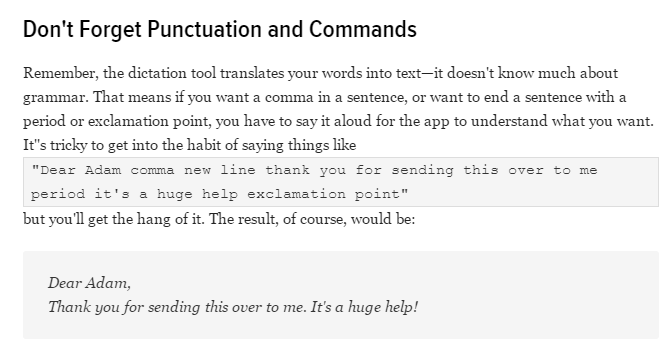 Figure 7: From Lifehacker, http://lifehacker.com/5928902/how-to-talk-to-your-mac-using-dictation-effectively
Other tools for writing with impact
Google Docs Story Builder
Apps can be found to address all stages of the writing process. One tool my students enjoy for brainstorming is called DocsStoryBuilder, available from http://docsstorybuilder.appspot.com/.
|  |
This tool encourages students to have fun while creating short dialogs, such as to brainstorm ideas for a writing project. It’s not an app, and disappointingly, I have been unable to get its music to play on the iPad (so I play what the students produce on my PC), but their conversations can be created in text or event spoken into the iPad, and a url generated which can be shared with the teacher, or when students are logged into their Google accounts, shared on Google+. It’s quick and entertaining when the results are played on the teacher PC via the audio system from the front of the room.
- http://docsstorybuilder.appspot.com/UrwheJQun - Fast Food, jazzy
- http://docsstorybuilder.appspot.com/V0AYQdyjx - Abdullah and a ghost writer, social media
- http://docsstorybuilder.appspot.com/4lLSbXEAn - Driving fast, schmalzy
- http://docsstorybuilder.appspot.com/0zwCdc28j - Bicycles, driving beat
- http://docsstorybuilder.appspot.com/Y0d4XoBQV - Elderly people, schmalzy
- http://docsstorybuilder.appspot.com/WcoeeZSRx - Public transport, driving beat
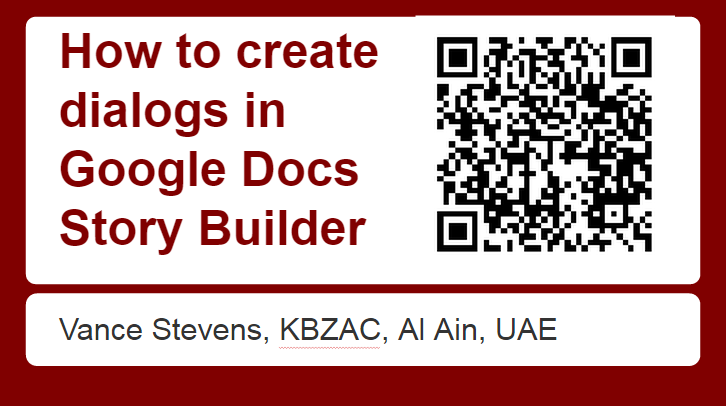
Figure 8: Tutorial for Google Docs Story Builder, with QR code that takes you there
I created this tutorial on how to use Google Docs Story Builder (see Figure 8). https://docs.google.com/presentation/d/1QPWWMNQvxHLCkmkBq4y7tsbkbuVfA72IoaplaAtf6gQ/edit?usp=sharing. There are other tutorials for Google Docs Story Builder online; e.g. Reading, (2015), and many more available through Google search.
As mentioned above, if your students are logged on to Google they can save their stories to their Google+ accounts or they can generate a link that they can copy and paste to a shared space. One such space that is very convenient to set up is Today’s Meet, https://todaysmeet.com/. Here a “room” can be created by anyone with or without a Today’s Meet account, and no one needs an account to simply access the room and write to it just by clicking the URL. Because it does not require a login, in some circumstances, it’s an ideal collaboration tool. If “anyone” comprises a class of students, then the teacher can create a room and all students can write to it and click on any links that anyone else places there (Figure 9). Everything written there is preserved for a time, up to a month or so, plenty of time for a teacher to follow up on a class by copying links of URLs recorded there in a more permanent online space where the students can see what each other created.

Figure 9: Today’s meet for creating a common place to share on the fly links and backchannel thoughts
Word Clouds by ABCYA
One of my favorite enhancements to writing is Word Clouds, such as those produced on PC by the well known http://worldle.net. Fortunately, there is a similar app for iPad called Word Clouds (when you search the app store it shows as Word Clouds by abcya.com). With this free app, students are able to generate word clouds on the iPad.
However, until recently they would have discovered that Apple does not make it as easy for you to insert images into Google Docs as you can on a PC. It could be done on iPad, but the trick was not all that intuitive, according to Herb (2014) as recently as September of that year (as shown in Figure 10), and many others, who went on to explain the work-around.
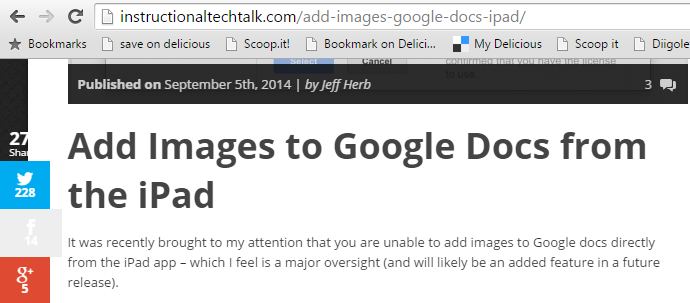
Figure 10: Screen shot of an article showing how as late as 2014 Google Docs provided no image insert tool for iPad.
However, in the course of giving my presentations at the recent ISTE conference, one of my attendees showed me that there has since been added a + function on the Docs app that looks like this (Figure 11):
However, in the course of giving my presentations at the recent ISTE conference, one of my attendees showed me that there has since been added a + function on the Docs app that looks like this (Figure 11):
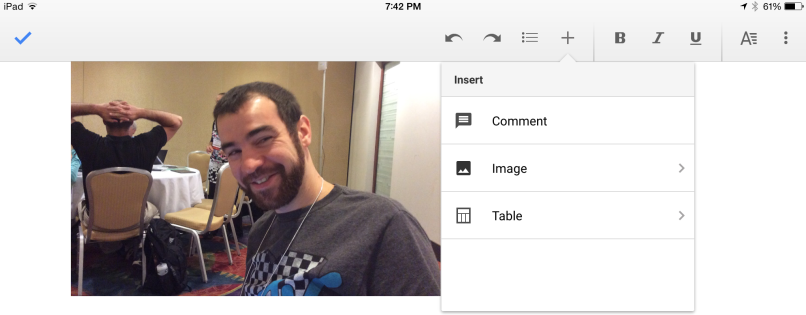
Figure 11: Attendees at my ISTE workshop in Philadelphia, 2015, show me that the image insert tool for iPad had been added by then.
And there you have it, easy photo insert into Docs. Before that addition to Docs functionality, you needed to bring up your Google Doc in a browser on the iPad and then avoid the invitations in the browser to revert to the app. Eventually you would arrive at the desktop version of Google Docs in your browser where you would find the familiar PC-based set of formatting tools, and where you could insert your picture.
And there you have it, easy photo insert into Docs. Before that addition to Docs functionality, you needed to bring up your Google Doc in a browser on the iPad and then avoid the invitations in the browser to revert to the app. Eventually you would arrive at the desktop version of Google Docs in your browser where you would find the familiar PC-based set of formatting tools, and where you could insert your picture.
 |
To help others achieve the workaround, I had made screen captures of the process on my iPad and created a tutorial for how to do it at my blog (Stevens, 2015b).
This new addition makes this no longer necessary. However, it still might be useful to know how to revert to desktop view for extended functionality with Google Docs on iPad compatible with PC.
|
Educreations
I mention Educreations in my workshops as a tool that can help students envisage ideas and communicate them spatially and graphically, but I don’t usually spend time on it because there is usually not enough time to spend, and this app is fairly intuitive. It’s a free app that does more or less what Explain Everything does, but Explain Everything costs $2.99 which can be an impediment to students without credit cards or the willingness to use them, whereas Educreations is free. And Educreations compares well with Explain Everything, e.g. http://chronicle.com/blogs/profhacker/ipad-screencasting-educreations-and-explain-everything/38662.
According to this comparison, Educreations appears to be simpler to use at the cost of greater flexibility available with Explain Everything. Another difference is that your Educreations are hosted in the cloud, but cannot be extracted from there, whereas Explain Everything allows users ownership of products created, for upload to YouTube for example.
Here is an example of one of my first Educreations (Figure 12).
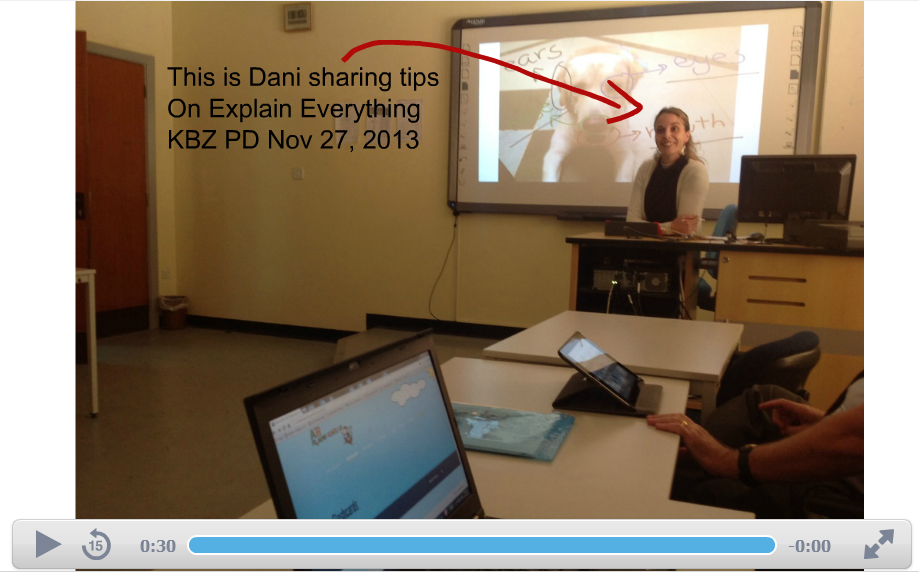
Figure 12: Dani Coelho introducing teachers where we work to the wonders of educreations, https://www.educreations.com/lesson/view/danipd/14244001/
On-site Workshop Plan
At the workshop we gave at ISTE 2015 in Philadelphia, the way I intended to allocate my time was explained here (this is for the record; in practice, pace and content of the 45 minute workshop sessions were dictated by participant interest and ability):
https://docs.google.com/presentation/d/1bYqdrx4zWqJCHICGug-p5_orQsTgLulQUibhuN3EDLI/edit?usp=sharing
10 minutes - introduce the topic
35 minutes - practice
Google Docs Story Builder and Today’s Meet
5 min - Find a partner, introduce yourself, discuss (suggestions) …
- What do you teach in common?
- What do you like about Google Tools?
- What do you hope to gain from this workshop?
- What’s the point of technology?
- whatever else comes up
In 5 min. you should have settled on a topic for the next exercise
Next 10 min - Commit your discussion to Google Docs Story Builder
|  |
Google Docs tips and techniques
10 min -- Create a Google Doc, share it with vancestev@gmail.com
- Title it with your name / ISTE 2015
- Divulge something interesting or surprising about yourself OR
- report the chief take-away from your Google Docs Story Builder dialog
- Write the link of your GDSB in the document
10 min - Make a Word Cloud, save it in your camera roll
- Follow the tutorial to insert it into your word document
http://toolkit4learning.blogspot.com/2015/03/tutorial-on-posting-images-to-google.html
As an option to any of the above
- Experiment with voice tools in Google Docs
- add comments
- add text
- Engage with the presenter using the techniques described above
In time remaining, create an Educreations or Explain Everything artifact and link to it in your Google Doc.
In practice, and in order to let participants at my workshops direct the pace and flow of what they wanted to learn from what I had to offer, none of the mini-sessions I ran at ISTE followed this script in its entirety.
Online Presentation
I have since presented this at a virtual conference online. on Sun Aug 9, 2015, I presented "Learning2gether with Vance Stevens on Teaching Writing with Voice on iPads and Mobile Devices" at the MMVC15 – Moodle Moot Virtual Conference hosted by Nellie Deutsch. There is a WizIQ recording of the talk here, http://www.wiziq.com/online-class/2878405-mmvc15-writing-and-tablet-voice-tools, from which I extracted an mp3 rendition downloadable here: https://learning2getherdotnet.files.wordpress.com/2015/08/2015aug09vance_mmvc15.mp3?.
These are the slides I used for this presentation
http://www.slideshare.net/vances/mmvc2015-teaching-writing-using-voice-tools-on-mobile-devices-and-i-pads I blogged the event at http://learning2gether.net, where it is archived here http://learning2gether.net/2015/08/09/learning2gether-with-vance-stevens-and-many-others-at-mmvc15-moodle-moot-virtual-conference-hosted-by-nellie-deutsch/
In Conclusion
It is difficult in the fluidity of a workshop context, and perhaps unwise, to attempt to direct peer practice along such pre-conceived lines as outlined above. Many of our ISTE participants would have been aware of some of these affordances, but for many whom I have addressed in other contexts, the idea of app-smashing voice and some of the other tools mentioned into an environment to enhance student writing has been enlightening. These presentations have prompted me to learn more and to refine my techniques, and to explain them in ways that are approachable by a range of educators. For these reasons, I feel that what I have come to learn in my own practice using PCs and iPads to facilitate writing has been of benefit to some, and I am happy to share what I know here.
References
Clanfield, L. (2014). Rediscovering writing: Re-examining writing in the modern language classroom. Presentation delivered at EOI Alicante, and repeated at TESOL Arabia, Dubai in March, 2015. Available: https://app.box.com/s/0xsjv54sbh18uqx3j01a.
Crystal, D. (2008). Txtng: The gr8 db8. OUP.
Pegrum, M. (2009). From blogs to bombs: The future of digital technologies in education. Crawley, Australia: The University of Western Australia Publishing.
Reading, M. (2015). Get your students developing their writing skills with Google Story Builder Using Technology Better. Available: http://usingtechnologybetter.com/google-story-builder/.
Reading, M. (2015). Get your students developing their writing skills with Google Story Builder Using Technology Better. Available: http://usingtechnologybetter.com/google-story-builder/.
Stevens, V. (2015a). Developing online listening exercises for natural English. Teacher’s toolkit for shared learning. Available: http://toolkit4learning.blogspot.ae/2015/03/developing-online-listening-exercises.html
Stevens, V. (2015b). Tutorial on Posting Images to Google Docs on iPad. Teacher’s toolkit for shared learning. Available: http://toolkit4learning.blogspot.ae/2015/03/tutorial-on-posting-images-to-google.html.
Notes:
This article was prepared for the ISTE conference in Philadelphia, June 28, 2015
http://iste2015ipadagogyabloominbetterwaytoteach.pbworks.com/w/page/92494251/Writing%20-%20Vance%20Stevens for the workshop: iPadagogy: A Bloomin' Better Way to Teach scheduled for 8:30 - 3:30 PM in Marriott Franklin 1, Philadelphia.This version has been revised and updated in July, 2015
http://iste2015ipadagogyabloominbetterwaytoteach.pbworks.com/w/page/92494251/Writing%20-%20Vance%20Stevens for the workshop: iPadagogy: A Bloomin' Better Way to Teach scheduled for 8:30 - 3:30 PM in Marriott Franklin 1, Philadelphia.This version has been revised and updated in July, 2015
This paper was originally prepared for TESOL 2015 Toronto as part of a workshop Thursday, March 26th 3:00 – 4:30 PM in the CALL-IS Electronic Village entitled iPadagogy: A Bloomin' Better Way to Teach
presenters Dani Coelho, Ellen Dougherty, Nery Alvarado, and Vance Stevens
The slides for that presentation were revised and will be run from my iPad using the Google Slides app at TESOL 2015 in Toronto on March 26, 2015, here: http://tinyurl.com/vance2015writing
and for this writeup is http://tinyurl.com/vance2015writing-doc
That version was previewed in Hangout on Air March 15, 2015 and recorded as Learning2gether with Vance Stevens and TESOL 2015 iPadagogy preview
Another version of this presentation, this time a preview for ISTE, was produced on Sunday, June 7 - Learning2gether with Vance Stevens – Teaching Writing on iPad and mobile devices using Voice Tools
http://learning2gether.net/2015/06/08/learning2gether-with-vance-stevens-teaching-writing-on-ipad-and-mobile-devices-using-voice-tools/ ; http://sco.lt/9HlqQj
The slide show associated with the current version of this writing is at http://tinyurl.com/iste2015vance
Yet another version of this, focusing on just the voice aspects of giving feedback on student writing has been prepared for and submitted to TESL-EJ. Entitled Finding your voice: Teaching writing using tablets with voice capability, the draft can be found here
https://docs.google.com/document/d/1x4moU30MI_Uk_OKlTipv1yxiB5dbjF6p5BEGwaeHKos/edit?usp=sharing
This has since been published as
Stevens, V. (2015). Finding Your Voice: Teaching Writing Using Tablets with Voice Capability. TESL-EJ 19 (3) 1-11. Available: http://tesl-ej.org/pdf/ej75/int.pdf
Also available unpaginated in html: